Pages

Wednesday, March 28, 2012

Terrariums. Ideas.

So I've really been wanting to garden. Really.
Seems how I am without a garden at the apartment...I wanted to make some inside-pots or venture into constructing a terrarium ^_^ ...I think I've been missing digging in the dirt back home. * reminiscing about my job in high school when I did work at the local garden center and greenhouse*

Maybe something like this?
Hmm. The above shown would prolly be the easiest to make. Although, THIS would be cute:

..a lightbulb?! Yes. But I think I might just start simple with a jar or an old glass gallon jug that I have.

After looking through numerous tutorials, I thought this to be one of the better ones: "DIY make your own terrarium". Essentially, I need to still get:

  • Some rocks/pebbles/drainage layer
  • Activated Charcoal
  • Soil (special soil for succulents/cacti and potting soil for everything else)
  • Maybe moss [dried]/maybe sand
  • Plants
Annnd a snippet from http://tryscience.org/nld/handson1.html :

  • Desert – For a desert terrarium use a heavy sand mixture with rocks/gravel. Use your rock/gravel to form your first layer and then follow this with 2-3 inches of sand depending on the size of your bottle. Add twigs, cacti and other flora that tolerate dry weather conditions. Instruct students to add only a little bit of water every couple of weeks.
  • Rainforest – To create a rainforest like terrarium use a heavier concentration of soil and water. Start your first layer with a powdered clay (if available). Next add 3-4 inches of soil with water already added to the mixture. Use ferns inside of your terrarium.
  • Prairie – To create a prairie like terrarium use a 50/50 mixture of soil and sand. Add a layer of gravel and then 3-4 inches of your soil/sand mixture. Add a couple teaspoons of water and plant wild grasses in this ecosystem.


....and now to track down this stuff. Succulents might be my first endeavor :) 

Succulents!
OH MAN. I think this idea just blew my mind: 
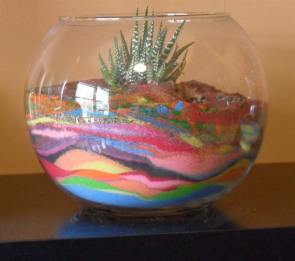
Using COLORED sand!!

Wednesday, March 21, 2012

Breakin' 'Em In.

Look! Monster-truck-boots. 
My new mountaineering boots. 
Kitten-stomping-boots.

Duckies!


Stormy having a good 'ole time.


On Rock. Rock On.

Location: The Bank....@ The Shelf in Canyon City, CO.

Fun times.


Choice.

ICE. Climb it.

Frozen waterfall. Schweeeet.
Crampons. Stylin'.
Ice picks. I look like a velociraptor. *raaawwr*

-It's always nice having access to expensive gear that isn't yours. *smiles* ..annd it's a bonus when you have friends that will go with you on random adventures with said gear.
-Makes for a great day.

 Location: Somewhere in CO Springs....where there's a waterfall.

Spicy.

-I have a thing with saving certain glass items to recycle or upcycle them for a good cause. So the new year saw me delving into a a few small projects like this one: new spice rack.
-I saw the idea for glass etching through the DIY forums as well as reusing the bottles of those delicious starbucks frappes. And well...I wanted some fancier spices than the plastic ones from the store.

Materials:
-Any number of used starbucks frappe bottles (1 per spice :)
-Spices
-Dish soap
- Glass etching cream & stencil letters
-Paint brush OR the classy cotton Q-tip

-So I started out by washing the bottles in warm soapy water. I soaked the bottles for a few min and was able to easily peel off the labels front and back. Taking a washcloth, you can scrub off any remaining residue leftover from the labels. Dry.
-Take the stencil letters, which are reusable and can be reapplied many times, and make some words! I did spices: basil, rosemary, oregano...as well as sugar, brown sugar, cinnamon, and "taco" (my taco seasoning that I put together). You could also do any other spices that you have a plethora of.
-Using your fancy paintbrush (or Q-tip!) apply the etching cream generously on the stencil letters...let dry...peel off the stencil...brush off excess dried cream...and voila! FANCY SPICE BOTTLE.
-Fill the bottles up with the appropriate spice (or don't...and be cool like that).


BAM. Fancy.

[I have not yet figured out if they are machine washable...or washable...]

Thursday, March 15, 2012

I have toilet paper rolls on my wall.

When I moved to CO and was looking for a job, I also had a bit of down time while waiting for someone to call and offer me a job. So naturally, I glazed my eyes over the internet looking at bunches of ideas for DIY projects and things to keep me amused. And amused I was. When I started saving toilet paper rolls though, my bf gave me funny looks and sweetly humored me as he helped contribute to the bag that was filling up in the bathroom. I was determined to do something with these little cardboard tubes.
I stumbled across this: DIY toilet paper roll wall art and had to do it. We had just moved and I wanted to use this as a cheap excuse to decorate the naked walls.

I somewhat followed the instructions on that website, but here is what I did:
Materials:
-At least 10 or so toilet paper tubes (I also used paper towel tubes)
-Glue (even simple craft glue)
-Spray paint (I used two different colors)
After trimming down the box top to a shallower fit, I started by flattening the tubes in half in order to be easier to cut--cut the tubes into 1/2in. pieces. Using the cardboard box top as a frame, I laid out the design that I wanted and glued the "leaf" looking toilet tube pieces to the box top. After allowing the glue time to dry, I took my spray paint and box top design outside and sprayed the one color [metallic green] aiming down from the top of my frame and the other color [bronze] from the opposing angle. So the finished frame looks different colors from where you stand.

The finished project:
...and it only cost me $6.54 for the spray paint (recycled the toilet paper tubes and already had the elmer's glue).

Nbd.

Escaping sleep.

5am MST.
7am EST.

...either way...I need sleep.
My insomnia spells happen more than they should during the winter/spring. Thankfully, this winter hasn't seen the worse of my "coma naps" (characterized by sleeping >4hrs during a nap that was meant to be...probably 2hrs.) I think living somewhere that has sunshine most days during the winter season has benefited me greatly in regards to feeling the need to sleep endlessly. Hibernation, what?
But insomnia...heh...whole 'nother ball game. Coma-nap=take a nap >4hrs, wake up and try to go to sleep at a normal bedtime, fail, stay awake for a bit, finally attempt sleep, annnnd sleep. But if I didn't take a nap, and I'm awake at 5am for no reason, then...frick.
-For the record, I DID attempt and succeed in sleep tonight at some point...I think it was at 10:30pm that I went to sleep, then later at 2am woke up from a stupid dream and could not fall back asleep for the life of me.-

On the plus side, my insomnia spells are very productive. I crochet. knit. watch hulu. facebook stalk. journal. drink tea. check email. repeat everything mentioned. and then I create blogs. My blogs in past years have usually survived for a couple years, here and there. I get busy, go on a hiatus, figure there's too much of a time gap and eventually shut the whole thing down. BUT. But this time...I will try to keep this blog alive for a month a couple months a year awhile and blog about the meanderings of my mind: crafts (because this is what fuels the productiveness during my insomnia anyway), travels, interesting musings, and life.

I feel accomplished.
Created a blog, made a twitter account (just because), tweeted my first tweet (god that sounds lame), posted a post, did some crocheting, put a pika on my page (soo cute!), and found myself way-too-happy about the wine-gadget that I found and put at the bottom of my blog (score). nbd.

...I can now go to bed and attempt sleep again...and then try to wake up to my alarm at 8am for a run [and probably sleep through it and not go work out]. This is why I am out of shape.